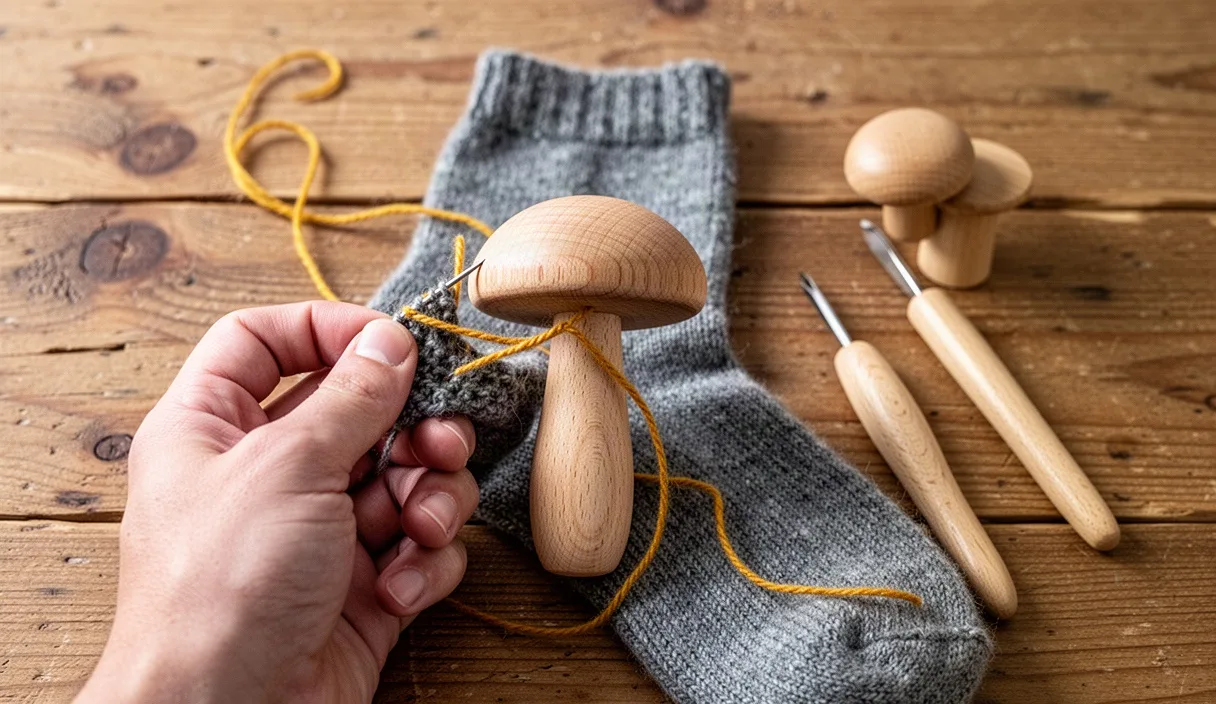

Wool socks rarely give out all at once. They thin quietly over months of friction inside boots and shoes, shedding microscopic fibers until the heel or the ball of the foot turns into a sheer, fragile screen. Tossing a hand-knit or heavy hiking pair into the rag bin because of a thumbnail-sized gap wastes good wool, especially when mending requires only a blunt needle, an appropriate thread, and a simple turned block of beech or birch wood shaped like a button mushroom.
A wooden darning mushroom provides a firm, curved foundation that mimics the natural contour of your heel and toe. Working on a flat table often leads to puckered, rigid patches that irritate your skin on long walks. By stretching the sock lightly across the smooth cap of a mushroom, you preserve the natural bounce and curve of the knitwear. The method outlined below uses a classic woven darn, which rebuilds structural threads where the original knit has worn away.
Inspecting the Wear Before Holes Form
Catching worn wool early saves considerable repair time. Before an open void appears, a sock enters what knitters call a shadow stage. Hold the sock up toward a window or a desk lamp with the inside facing you. If you can see light passing distinctly through the mesh while surrounding areas remain dark and dense, the yarn plies have eroded. At this stage, you do not have an actual hole to bridge, but the area needs reinforcement before it splits along a row of purl bumps.
Map the boundaries of the thin fabric by running your fingers gently along the inner surface. Weakened wool feels soft, slippery, and noticeably thinner than the firm ribbing of the leg. Mark the perimeter of the weak zone mentally or with a water-soluble fabric marker, keeping an extra margin of roughly 6 to 8 millimeters beyond the thin patch. Your repair must anchor into healthy, tightly twisted wool loops. Stitching directly into dying, fuzzy fiber will cause the patch to pull away during the next wear.
Inspect the surrounding tension zones. Socks wear out unevenly depending on gait, shoe shape, and foot anatomy:
- Heel apex: Suffers direct abrasive rubbing against internal heel counters. Requires a dense, closely spaced weave.
- Ball of the foot: Bears dynamic downward pressure. Benefits from a slightly more elastic yarn or duplicate stitch backing.
- Big toe pocket: Usually punctures cleanly from upward nail friction. This creates a clean-edged hole bordered by intact yarn.
- Achilles band: Thins due to slipping shoe collars. Usually wide, diffuse, and suited to broad surface reinforcement.
Selecting Matching Yarn and Darning Needles
Success rests on matching your mending fiber to the properties of the sock. Never use glazed sewing thread or mercerized cotton embroidery floss to mend a winter wool sock. Cotton does not stretch, while wool flexes with every stride; cotton threads will slice through softened wool loops under tension. Instead, select wool mending yarn, lightweight sock wool (often blended with nylon at ratios like 75 parts wool to 25 parts nylon), or crewel yarn.
| Fiber Type | Best Use Case | Durability Level | Stretch Factor |
|---|---|---|---|
| Pure Shetland wool | Heavy hand-knit socks, low friction zones | Moderate | High |
| Wool-nylon blend (fingering weight) | Everyday boot socks, high-abrasion heels | Very high | Moderate |
| Split crewel wool | Fine dress socks, thin gauge knits | Low to moderate | Low |
| Spun mohair-wool blend | Toe pads, heavy walking socks | Extremely high | Moderate |
Pair your thread with a blunt darning needle (sizes 18 through 22 work well for standard boot socks). A sharp sewing needle is a hazard here: its pointed tip will pierce and split the remaining wool plies instead of gliding between them. A blunt tapestry or darning needle separates the knit loops safely, allowing you to catch the structural loops without shredding the yarn core.
Positioning the Sock Over the Wooden Tool
Turn the damaged sock right-side out, or leave it wrong-side out if you prefer to hide your working loops on the interior. Most repairers keep the exterior side facing up to monitor the final look of the patch. Slide the wooden mushroom cap into the foot cavity, centering the rounded top directly beneath the hole or worn mesh. The handle should extend down toward the cuff or out through the ankle opening, giving you an ergonomic anchor to hold while working.
Smooth the fabric over the polished timber until the knit lies flat and unwrinkled, but avoid stretching the sock to its absolute limit. If you pull the fabric taut like a drum skin, your finished darn will shrink into an unyielding knot as soon as you remove the wood, leaving the sock smaller than before. The ideal tension gently opens the knit mesh without widening the existing hole.
Secure the fabric in place around the mushroom neck. Many vintage mushrooms feature an indented groove below the head, designed to catch an elastic band or cotton ribbon. Wrap a standard rubber band around the sock just beneath the curve of the mushroom cap. This prevents the fabric from creeping or rotating while you guide the needle, keeping your stitching lines straight and square across the entire surface.
Running the Warp Threads Across the Gap
A woven darn consists of two passes: vertical warp threads that bridge the gap, followed by horizontal weft threads woven through them. Thread your needle with a comfortable arm-length of yarn (roughly 45 to 50 centimeters). Do not knot the tail. Knots create hard pressure points inside your shoes that can blister heels in less than a mile of walking.
Begin placing the warp anchors on healthy fabric about 8 millimeters to the left of the hole. Orient your stitches to run parallel to the vertical wales of the knitwear:
- Anchor the yarn: Take three tiny running stitches through the sound knit, leaving a 5-centimeter loose tail on the outside surface to be woven in later.
- Span the perimeter: Move the needle upward across the thin area, ducking in and out of the existing knit loops, then pivot with a tiny loop at the top edge.
- Bridge the opening: When your path crosses the actual open hole, draw the strand straight across the gap in midair without pulling the edges together. Keep the thread resting lightly against the wooden dome beneath.
- Anchor the opposite bank: Pierce into the stable knit on the opposite side of the void, capturing sound loops for 6 to 8 millimeters before pivoting.
- Turn and repeat: Reverse direction, leaving a tiny micro-loop at the turnaround point to account for future shrinkage. Lay the next warp strand directly beside the first, separated by no more than the thickness of the yarn itself.
Continue this sequence from left to right until the entire open void and any neighboring thin spots are covered by a dense, parallel cage of suspended vertical threads. The hole will look like an open loom floor covered with taut strings.
Weaving the Weft for a Flat Finish
With the warp grid complete, turn the mushroom ninety degrees to lay the weft strands horizontally across the warp. If your needle still holds sufficient yarn, continue directly; otherwise, weave in the working end into sound fabric and start a fresh strand using the same running-stitch anchor method. Never knot new yarn mid-repair.
Begin weaving through the vertical threads across the top edge of your patch. Work perpendicular to your warp strings using a classic over-under motion:
- Pick up alternate threads: Pass the blunt needle over the first warp strand, under the second, over the third, and under the fourth until you cross the entire field.
- Anchor into the sides: When you reach the edge of the warp, take a tiny stitch through the sound knit at the perimeter to tie the patch into the sock body.
- Reverse and alternate: Turn back for the next row. If you went under a strand on the previous pass, you must go over it now. This alternating interlock is what locks the threads into a self-supporting textile shield.
- Pack the rows: Use the blunt nose or eye of your needle to gently nudge each weft pass upward against the previous row. The weave should be compact enough to fill the void, but not beaten down so tightly that the patch stiffens into cardboard.
- Maintain outer loops: Leave a minute slack loop at the end of each row. Wool contracts when wet; without these microscopic relaxation loops, the edges of the patch will pull the surrounding sock fabric inward during the first wash.
Repeat this alternating rhythm across the entire field until the open gap is completely hidden beneath a neat, flat grid of woven yarn. Secure the final weft pass by taking two or three running stitches into sound knit, then bring the needle through to the reverse side.
Washing and Setting Your Finished Patch
Once you snip the excess yarn tails (leaving about 4 millimeters extending inside the sock), the patch will look distinct and slightly raised. A gentle washing step is essential to lock the fibers together. Water, warmth, and gentle friction encourage wool scales to open, entangle, and settle, a process that transforms distinct thread paths into a cohesive, felt-like patch.
Fill a basin with tepid water (roughly 25 to 30 degrees Celsius) and add a pea-sized drop of gentle wool wash or mild hair shampoo. Submerge the sock completely, allowing it to saturate without wringing or stretching. Press the repaired zone gently between your fingertips under the water for two minutes. This light mechanical action coaxes the new mending wool to blend into the original spun yarn of the sock.
Rinse the sock in clean water of an identical temperature; dramatic temperature shocks cause untreated wool to shrink violently. Press the sock flat inside a folded terry towel to extract excess moisture. Lay the sock flat on a drying rack away from direct radiators or harsh sunlight, gently shaping the mended heel or toe over your knuckles while damp to restore its rounded form. Once bone dry, the patch will sit flush against your skin, durable enough for another winter of use.
Common Mistakes
- Pulling threads too tight: This causes puckering and creates an uncomfortable lump inside your footwear. The mushroom dome helps you judge tension, so keep the yarn resting against the wood without biting into it.
- Skimping on the margins: Anchoring warp threads right at the edge of a hole guarantees failure. The needle must travel into firm, uncompromised knitting at least 6 millimeters outside the fray zone.
- Using needlepoint or embroidery needles: Sharp tips split the wool ply and weaken the host fabric. A blunt tip is mandatory for clean navigation through existing loops.
- Tying interior knots: Even small knots under a heel will feel like stepping on sharp gravel after half an hour in walking boots. Rely entirely on woven running stitches for anchors.
- Mismatched elasticity: Cotton, linen, or high-tensile polyester threads lack natural bounce and will tear the softer wool around them under standard foot flex.
Next Steps in Textile Care
Now that your first repair is complete, examine the rest of your wool drawer. Sort through seasonal socks before storing them away for the summer; moth larvae target soiled wool far more aggressively than clean fibers, and tiny thin spots turn into gaping holes if left under tension in storage boxes.
If you encounter an exceptionally large tear where the knit structure has unraveled over several centimeters, a woven darn can become thick and heavy. In those advanced situations, learning Swiss darning (duplicate stitching) or picking up dropped loops with a fine 1.5-millimeter crochet hook will allow you to reconstruct the actual jersey knit rather than weaving an overlaid patch. For rare, heirloom, or antique hand-knitted textiles, it is best to consult an experienced textile conservator before cutting away loose threads or applying heavy mends.