
A wooden chair endures more mechanical torment than almost any other item in a home. Every time someone leans back on two legs, shuffles across a floor, or sits down with enthusiasm, lateral force travels straight down through the seat into the mortise and tenon joints or dowel sockets. Over years of seasonal shifts in humidity, solid wood swells in damp summers and shrinks in dry winters. Eventually, the brittle adhesive inside the socket fractures, leaving you with an unsettling wobble and a joint that clicks like an old knee whenever weight shifts.
Fixing this is among the most satisfying weekend tasks you can tackle. You do not need an industrial workshop, but you do need patience, a couple of basic hand tools, fresh glue, and a willingness to break the problem down into logical steps. Rather than driving a dry screw through the exterior wood, which almost always splits the grain and destroys the salvage value of the chair, taking the joint apart to repair the hidden wooden dowels or tenons will restore the piece for decades.
Diagnosing Which Joint Has Failed
Before reaching for a hammer or a bottle of glue, you must isolate the failure. A chair acts as an interconnected web of levers. When a bottom stretcher is loose, the seat joint above it might seem unstable even though it is structurally intact. Placing the chair upside down on a workbench or kitchen table gives you a clear line of sight along the structural connections without fighting gravity.
Grip one leg firmly at the foot and apply gentle back-and-forth pressure along the axis of the joint, then twist slightly. Watch the seams where the round stretcher rungs meet the vertical legs. If you see a hairline gap opening and closing, or if dried powder puffs out from the seam, that joint has failed. Mark each loose connection with a strip of blue painter tape so you do not lose track once you begin disassembly.
You should also verify whether the joint uses integral round tenons turned directly onto the ends of the stretchers or separate dowels inserted between two bored holes. Factory-built chairs from the mid-twentieth century onward almost universally employ separate dowel pins, whereas older country chairs usually have turned tenons. Knowing the difference matters because a broken separate dowel can be drilled out and replaced completely, whereas an integral tenon must be preserved and rebuilt using shims.
| Symptom | Probable Internal Cause | Required Intervention |
|---|---|---|
| Joint wiggles freely, pulls out by hand | Adhesive breakdown due to timber shrinkage | Glue cleanout, shim fitting, fresh PVA re-glue |
| Joint pivots on an axis but does not pull free | Dowel pin is snapped across the shear line | Disassembly, core drilling, dowel replacement |
| Wood around the mortise shows vertical splits | Excessive lateral leverage or bad screw repair | Grain gluing, clamping the leg, then re-boring |
Disassembling Components Without Cracking Rungs
Resist the temptation to force components apart by twisting them dry. Dried hide glue or brittle modern polyvinyl acetate (PVA) can still cling stubbornly to small patches of wood grain, and twisting will tear out longitudinal fibres or snap the thin neck of a turned rung. Disassembly requires controlled, axial impact spread over a wide surface area.
Use a dead-blow mallet with a polyurethane head filled with steel shot. The dead-blow design transfers energy into the joint without bouncing, which reduces the chance of splintering the wood. Never strike the chair components directly with metal or hard plastic. Cut a sacrificial scrap of softwood, such as pine or spruce, approximately 4 inches long, wrap it in a clean shop rag or a piece of thick leather, and hold it against the shoulder of the joint you wish to loosen. Strike the scrap wood, directing your blows outward along the line of the tenon.
If the joint refuses to budge after half a dozen moderate strikes, old glue is holding fast in pockets. You can soften many traditional adhesives by introducing mild heat and moisture. Soak a rag in warm water, wring it out so it is damp rather than dripping, wrap it around the seam, and direct the warm air from an ordinary hair dryer at the zone for five minutes. Do not use an industrial heat gun on high settings, which will blister varnish and scorch natural wood oils. Once the joint warms up, tap the sacrificial block again until the tenon slides free from its socket.
Cleaning Old Glue from Tenons and Holes
Wood glue forms a bond by penetrating the open cellular pores of the timber. New PVA glue will not bond properly to old, crystallized glue. If you simply pump fresh adhesive into a dirty mortise hole, the new glue adheres only to the old residue, and the chair will start wobbling again within six months. You must clear both surfaces back to sound, bare wood.
To clean an integral tenon or the end of a dowel pin:
- Scrape the circumference using the back edge of a chisel or a dedicated card scraper. Keep the blade perpendicular to the wood to scrape away the glue glaze without cutting into the structural timber.
- Use a strip of 120-grit aluminium oxide sandpaper pulled back and forth in a shoeshine motion around the cylindrical surface until bare wood is visible.
- Avoid coarse sandpaper or aggressive rasps, which will reduce the outside diameter and create an even looser fit.
Cleaning out the mortise hole requires a different approach. Insert a round wire tube brush, or wrap a small cylinder of 100-grit sandpaper around a wooden dowel that is slightly smaller than the hole diameter. Rotate the dowel inside the socket by hand. If thick crusts of old animal glue linger at the bottom of the blind hole, chip them away carefully with a narrow, flat-tipped screwdriver or a small carving gouge. Vacuum out the dust and wipe the interior with a lint-free cloth lightly dampened with denatured alcohol to lift residual contaminants.
Fitting Hardwood Shims for Loose Mortises
Once the components are clean, insert the dry tenon back into its hole to test the fit. In an ideal joint, the tenon enters with firm hand pressure and does not tilt or rock. In a chair that has wobbled for months, you will likely find that the tenon sits loosely in the hole, with an audible clatter when you shake it. Standard wood glues cannot bridge wide gaps. They dry rigid and brittle; when subjected to shear loads, thick pockets of unsupported glue crumble.
You can solve this diameter gap by installing thin hardwood shims or wood veneer collars. Measure the play using a mechanical feeler gauge or by visual inspection. If the play is roughly the thickness of heavy paper, a thin strip of birch or maple edge-banding veneer wrapped around the tenon provides the required mass. Avoid softwoods like pine for this job because they crush under tension.
For joints with substantial play, cutting a slot into the tenon tip and driving a wedge is the most robust structural technique:
- Secure the stretcher in a bench vice with padded jaws.
- Using a fine-toothed Japanese pull saw or a gent saw, cut a straight kerf down the centre of the tenon, parallel to the direction of the chair leg grain, cutting to a depth of roughly three-quarters of the tenon length.
- Carve a small, tapered wedge from a piece of dense hardwood like oak or ash, matching the width of the tenon.
- When you drive the tenon home during final assembly, the wedge hits the bottom of the mortise hole, spreads the split tenon outward, and locks it against the walls of the socket.
Applying PVA Glue and Strap Clamping
Select a quality cross-linking PVA wood glue (often labeled as Type II or interior/exterior PVA). Traditional liquid hide glue is also a sound choice if you want historical authenticity and absolute ease of repair fifty years down the line, but cross-linking PVA offers superb tensile strength and an accessible working window for home woodworkers. Avoid polyurethane glues that foam up as they cure; the foam carries virtually no structural strength and simply makes a mess on finished surfaces.
Coat both mating surfaces thoroughly. Use an acid brush, a clean craft brush, or a simple wooden coffee stirrer to paint an even film of glue across the interior walls of the mortise hole and around the outside face of the tenon. Coat the shoulder where the rung meets the leg as well, as this face-to-face contact prevents twisting. Push the components together firmly by hand, twisting slightly as they seat to spread the adhesive uniformly.
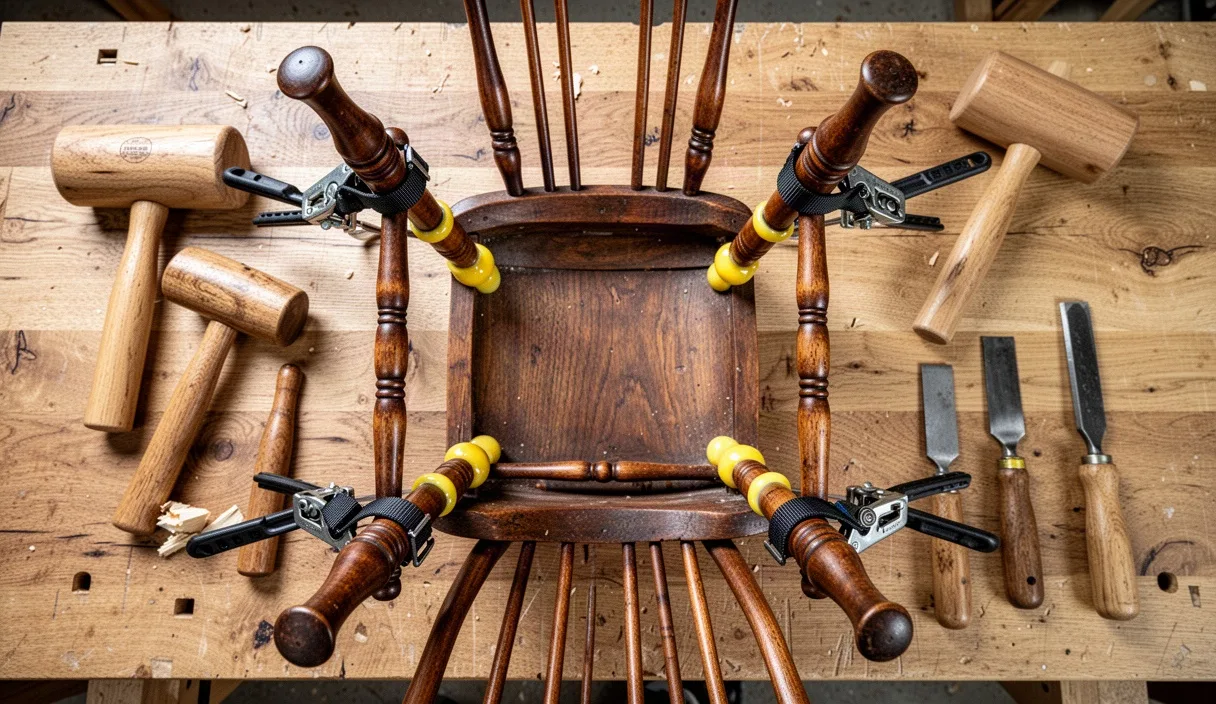
Clamping a chair requires pressure from multiple directions simultaneously. Traditional bar clamps are awkward to seat on curved chair legs and can slip, marring the wood. A nylon ratchet strap clamp, often called a band clamp, is far better suited for this purpose. Wrap the strap around all four legs at the level of the stretchers. Protect the corners of the legs by placing notched cardboard corners, cork pads, or wooden V-blocks under the strap before tightening.
Crank the ratchet until the strap is taut and the shoulders of every joint pull tight against the legs. Do not over-tighten to the point where the wood bows or all the glue is forced out of the joint. You want enough continuous pressure to hold the components firmly against their seats while the adhesive sets.
Cleaning Squeeze-Out and Checking Square
When you apply proper clamping pressure, a thin bead of glue will squeeze out around the perimeter of the joint. How you handle this squeeze-out affects the final appearance of the chair. If you wipe wet PVA glue vigorously with a wet cloth, you dilute the glue and force it deep into the open pores of the surrounding finished wood, leaving a cloudy halo that resists touch-up stains and waxes.
The cleanest method is to wait roughly twenty minutes, depending on room temperature, until the squeezed-out glue transitions from a liquid state into a rubbery gel. At this point, slide the tip of a flexible plastic putty knife or the shaped corner of a wooden pop stick along the joint seam. The gelled glue will lift away in clean ribbons without smearing across the finish. Any tiny remnants can then be removed with a clean rag dampened with warm water.
Before leaving the chair to cure, you must check that the frame sits square and flat:
- Stand the chair right-side up on a known flat surface, such as a cast-iron saw table or a level kitchen counter.
- Look down from above to confirm that all four feet make firm, flat contact with the surface. If one foot lifts slightly, the strap clamp is pulling unequally. Loosen the strap slightly, press down on the chair seat to seat all feet on the flat deck, and re-tighten.
- Take a tape measure and measure the diagonal distance between opposite front and rear legs at the floor line. Both diagonal measurements should match to within 2 mm.
Leave the chair in the clamps undisturbed for a minimum of 24 hours. The glue may claim an initial set time of thirty minutes, but full cure and load-bearing strength require a complete day, particularly when hardwood shims have absorbed adhesive moisture.
Common Mistakes to Avoid
The most frequent error in furniture repair is attempting to bypass disassembly by injecting expanding polyurethane glue into an active crack. Polyurethane expands into void spaces, but the resulting cellular foam has no shear resistance; the chair will become loose again within a couple of weeks, and the cured foam makes subsequent repairs twice as difficult.
Another damaging mistake is driving drywall screws or nails from the outside of the leg into the tenon. Wood fibers do not tolerate non-tapered metal fasteners driven across the grain without relief holes. The fastener acts like a wedge, splitting the chair leg along its entire length the first time an adult sits down. Screws have their place in joinery, but never as an emergency band-aid through the side of an uncleaned dowel joint.
Next Steps for Lasting Repairs
Once the 24-hour cure cycle finishes, release the strap clamp and inspect each joint closely. Tap the chair feet gently against the floor to check for rattles. With the frame rigid once more, this is the ideal moment to apply a high-quality paste wax or drying oil to the entire chair, rehydrating timber that may have dried out near radiators or drafty doorways.
If you encounter a chair that displays historical provenance, makers' stamps from notable designers, or delicate, paper-thin antique veneers, step back before using modern PVA adhesives. These pieces benefit from reversible protein glues like hot hide glue, which preserve the artifact value. When dealing with an item of significant antique or monetary value, consulting a certified furniture conservator is the most prudent path to protect your heirloom for the long term.